Recipes For Fudge and Divinity....These Are Christmas Traditions At Our Home!!


Fudge
  • 3 cups sugar
  • 3/4 c. butter or margarine
  • 2/3 c. evaporated milk
  • 1 jar 7 oz marshmallow cream
  • 1 pkg. 12 oz semi-sweet morsels
  • 1/2 c. chopped nuts
  • 1 teaspoon vanilla flavoring
Stir together butter, sugar, and milk in a medium size heavy pot, bring to a boil, stir constantly. Boil 5 minutes, (be sure to set a timer) and cook over medium heat. Remember to stir constantly. Remove from heat, gradually stir in remaining ingredients. Pour into a 13 by 9 inch pan that has been foil lined all the way over the sides and sprayed lightly with cooking spray. Cool at room temp. When cooled lift from the pan and cut into bite size pieces. This recipe makes 3 pounds, plenty to share.
Enjoy!


**********************************************


Divinity
  • 2 cups sugar
  • 1/3 c. white karo syrup
  • 1/2 c. hot water
  • pinch of salt
  • 2 egg whites, well beaten
  • 1/2 c. chopped pecans
Beat the egg whites in a large bowl until they are foamy, set aside, leaving the mixer handy. In a small saucepan Mix and boil sugar, syrup, hot water and salt on about medium to medium high heat. Hold a candy thermometer in the pot while you stir with a spoon...there are candy thermometers with hooks to hook on the side of your pot, but I don't hang mine on the pot, I hold on to mine and keep it lifted in the liquid, making sure that it doesn't touch the bottom of the pot. If you hang it on the side of the pot and it touches the bottom of the pot and that is not good. You don't want to be taking the temp of the bottom of the pot, you want to take the temp of the liquid itself. Just thought I'd throw that little tip in there for you. Trial and error, learned tip from experience. Cook this mixture until it reaches the hard ball stage on a candy thermometer. This is very important. Stir it the whole time that it boils. This will take quite a while, I'd say longer than 15 minutes usually, it will start to feel like it's taking forever, but keep watching the thermometer while you stir and just keep stirring. When it reaches the hard ball stage quickly but carefully remove it from the heat, and carefully pour it slowly into the beaten eggs as you mix it with the mixer. This mixture is extremely hot, so be very careful. You will now mix it with the mixer on medium for a while, it will seem like it's not going to hold it's shape, but just keep mixing it until it holds it's shape . When it begins to hold shape, then quickly drop by teaspoon onto wax paper and let them cool.
Extra Tip: I've heard people say not to make divinity on rainy days, but I have made at in all kinds of weather and it turns out beautifully as long as your candy thermometer is working right.
Enjoy!

Sour Cream and Chives Bite Sized Baked Chicken....Wonderful Party Appetizer

You will need:
  • Boneless chicken breasts or strips ( I buy 1 and 1/2 pounds of boneless chicken breast to feed our family of 4, we eat this chicken served as a meal, and I serve 2 veggies and bread with it.) You can adjust the amount of chicken and other ingredients based on the size of people you are feeding. I'd say for appetizers this amount here would feed probably 6-8 people if you are serving other goodies to go with them.
  • Bag of sour cream and chives potatoes chips and a gallon size zipoc bag for crushing the chips
  • 2 eggs
  • 2 Tablespoons Milk
  • 1/2 stick of butter
  • nonstick cooking spray
  1. Line a cookie sheet with foil and spray it with nonstick cooking spray.
  2. Rinse chicken breast and cut them into bite size pieces, (if you'd like to save yourself the trouble of doing this step, you can buy boneless breasts that have been sliced into chicken strips.
  3. Mix the egg and milk in a bowl, and add chicken and stir
  4. Open bag of chips and put them inside of a ziploc bag and crush them with your hands until they are in tiny pieces. This is your breading for your chicken.
  5. Now add your chicken to the bag to coat the chiken well, then them on the prepared pan one by one.
  6. Melt butter and drizzle over the top of the chicken
  7. Cook in a 350 degree preheated oven for about 35 -45 min. until golden brown. The size that you cut your chicken into will determine the cooking time. Be sure the inside is no longer pink.
Enjoy with your favorite dipping sauce, honey mustard tastes great!
Tips: You can use whatever kind of chips you like, for a different variation on this recipe, I also love to use crushed cornflake crumbs sometimes too.

Mashed Potatoes, and Broccoli, with Stew Beef and Gravy ~ Beefy Moutain

You will need:

  • 1 pound of stew beef 
  • 1 package McCormick's Stew Beef Seasoning, (found in the gravy and seasoning packet section at the grocery store).
  • 16 oz. package of frozen broccoli and cauliflower mix
  • enough all purpose flour to coat stew beef in
  • 2-3 Tablespoons of vegetable oil
  • 1/2 of a chopped onion
  • salt, pepper and garlic powder
  • homemade mashed potatoes (if you don't have your own favorite mashed potato recipe mine is HERE  you'll have to scroll to the end of the post to find it

Wash the stew beef, put it in a large bowl. Sprinkle with salt, pepper, and garlic powder, coat with flour. Put the grease in a dutch oven or large pot, add the floured stew beef to the grease and brown on all sides. Then add the stew beef seasoning package and 3 cups of water, and the chopped onion, bring to a boil and then let it simmer until meat is tender usually for about 3 hours. Stir occasionally and then add more water as needed so that it does not become too thick. You want this to be the consistency of gravy when it's done. While this is cooking make your Homemade Mashed Potatoes, and set aside and cook the frozen broccoli cauliflower according to directions and until tender and drain.

When the meat has cooked long enough to become tender, you are ready to layer your meal. Put the mashed potatoes on the plate first, then the broccoli/cauliflower, then the stew beef and gravy.
This is a delicious combination of foods and so easy too. My husband's mother used to make a variation of this.  My family loves it. My oldest son came up with the name of this recipe "Mashed Potatoes, Broccoli Beef Mountain" I thought it was a great name! It feeds about 5-6 people. Now enjoy!

Edited: As a variation in flavor for the recipe, you can use 2 packages of McCormick's Mushroom Gravy instead of the Stew Beef Seasoning Package and use the amount of water stated on the gravy package directions, you can add more water as needed as it cooks, and if it gets too thick. Add water as needed for desired gravy thickness.

Delicious Spinach Manicotti

You will need:

  • 1/2 Onion chopped
  • 3 Garlic cloves chopped
  • 1 T. Vegetable oil
  • 1-1/2 cups Ricotta cheese
  • 1 cup (4 oz. Grated Mozarella cheese, divided)
  • 4 oz. Cream cheese, softened
  • 6 Tablespoons Grated Parmesan cheese, divided
  • 1 teaspoon Italian Seasoning
  • 1/2 teaspoon Black pepper
  • 1 Package (10 oz.) Frozen Chopped Spinach, thawed squeezed dry. Then put in a food processor or a blender to chop it finer, (you don't have to do this step, but I do because I like my spinach chopped up finer)
  • 8 Manicotti shells, cooked according to package directions, and drained
  • 1 Jar 26 oz. Great Value Traditional Spaghetti Sauce, (or your favorite brand spaghetti sauce)

In a small skillet add oil, onion, and garlic, saute this for several minutes. Set aside.
In a mixing bowl, mix ricotta cheese, 4 Tablespoons parmesan cheese, 1/2 cup mozarella cheese, Italian seasoning, and pepper. Beat smooth. Stir in the onion mixture, and spinach. Spoon this cheese mixture into a large gallon size freezer bag, and seal the bag, squeeze the mixture to one corner of the bag and then cut a small hole at the corner edge of the bag. Pipe the cheese mixture into the manicotti shells. Set aside. Grease a 13 inch by 9 inch casserole dish, and pour half of the spaghetti sauce in the bottom of the dish. Lay the stuffed manicotti shells on top, then pour the rest of the spaghetti sauce over the manicotti. Cover and bake at 350 degrees for 25 minutes. Uncover and sprinkle with remainder of the mozarella and parmesan chese. Bake 5-10 minutes or until cheese is melted. Makes 4-5 servings.
Serve with salad and texas toast
Enjoy!

Blackberry Pudding Tarts~ A Summer Favorite Dessert at Our Home


These delicious treats have been a summertime tradition since the year 2000. It's hard to believe that for 9 years we have made these....but we have.
Here's what you will need to make these:


  • 2 (10 oz. pkg. frozen tart shells, there is 8 shells in each package)
  • 2 quarts fresh blackberries (2 ~16 oz packages of frozen thawed can be substituted) but I always use the fresh, because we can pick them ourselves and they are available in our area
  • 1 cup water
  • 1 3/4 cups sugar divided
  • 1/2 cup self-rising flour
  • 1/4 cup butter or margarine
  • 2 1/8 teaspoon vanilla extract, divided
  • 1 cup whipping cream
  • for garnish fresh blackberries, mint sprigs if desired
1. Bake tart shells according to package directions; cool completely.
Bring Blackberries and 1 cup water to a boil over medium heat. Reduce heat, and simmer 5 minutes or until blackberries are soft.
2. Mash blackberries with a fork; pour through a wire-mesh strainer into a 4-cup liquid measuring cup, using back of spoon to squeeze out 2 cups juice, discard the pulp and seeds. (Boil the juice to reduce to 2 cups if necessary.)
3. Combine 1 1/2 cups of sugar and the flour in a saucepan; gradually add blackberry juice, whisking constantly until smooth. Bring to a boil over medium heat, and simmer 3 minutes or until thickened. Remove from heat. Stir in butter and 2 teaspoons of vanilla.
4. Spoon filling into prepared tart shells. Cool Completely.
5. Beat whipping cream at high speed with an electric mixer until foamy; gradually add remaining 1/4 cup sugar, beating until stiff peaks form. Fold in remaining vanilla. Important Note: Do not beat in the vanilla, it will make the whipping cream break down and fall apart. I've done it before and had to run back to the store for more whipping cream.
Place a dollop of whipping cream on each pudding tart, then put in the fridge, until chilled.

Makes 16 servings

Enjoy!

Summer Treat...Orange, Banana, Strawberry Smoothie


You will need:

  • 1 cup orange juice
  • 1/2 cup strawberry yogurt
  • 1/2 banana
  • 5 ice cubes

Mix this all together in a blender
This makes 2 delicious summer treats. You can change it around to suite your own taste and add fresh fruit to the mix, if you'd like to. (I just used what I happened to have on hand in the fridge).
Now enjoy!

Easy Strawberry Cheesecake Parfaits


You will need:

  • 1 pkg. (8 oz.) Cream Cheese, softened
  • 1 1/2 cups milk
  • 1 pkg. (3.4 oz.) Jello vanilla instant pudding
  • 1 1/2 cups thawed cool whip divided (save 1/2 cup of cool whip for finishing touch on top of parfait)
  • 24 vanilla wafers coarsely crumbled
  • 1 1/2 cups strawberries

Beat cream cheese with mixer until creamy. Gradually beat in milk. Add dry pudding mix; mix well. Mix in 1 cup cool whip.
Layer half each of wafers, strawberries and pudding mixture in 4oz. parfait glasses. Repeat Layers. Garnish tops of parfaits with the remaining 1/2 cup of cool whip and chopped strawberry.
This will yeild about 10 (4 oz.) parfaits
Chill, serve and enjoy!

Easy Tator Tot Casserole


You will need:

  • 1 lb. ground beef
  • 1/2 yellow onion chopped
  • garlic powder
  • salt and pepper
  • 1 can Campbell's Cream of Mushroom Soup (Store brand does change the taste of this recipe, so I recommend Campbell's)
  • Ore-ida Tator Tots
  • 1/2 of the soup can filled with water and 1/2 can of milk 
  • 8 oz. shredded cheddar cheese
  • 8 oz. shredded mozarella cheese.

Brown ground beef in a skillet with the chopped onion, sprinkle a generous amount of garlic powder, salt and pepper. After it is brown, drain and return to the pan.


Add the can of cream of mushroom soup to the meat, then add the milk and water. Bring to a boil.....remove from heat.....

Pour it in a greased oblong casserole dish.........top with the grated cheeses......


Then top with the tator tots, sprinkle the top with salt.....
Cook at 350 degrees for about 45 minutes until golden brown.

Let it stand for about 5-10 minutes before serving. Yummy....just look at that gooey cheese!

Serve it with a side salad, and your favorite bread .....I like Texas toast. Enjoy!

P.S. My boys like the tator tot casserole with ketchup, but I like it just like you see it pictured here! Hold the ketchup on mine, Please...
Enjoy~

Easy Yummy Salsa Recipe

This is such a delicious and easy recipe, and it tastes like fresh tomatoes are used, but they are canned...

You will need:

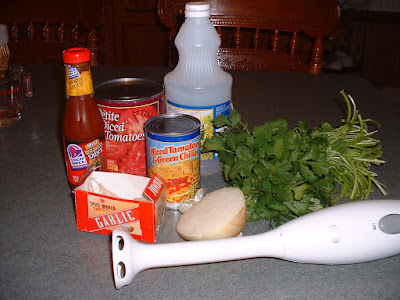
  • 1 can Rotel tomatoes and diced green chiles (I used great value brand)
  • 1 Large can of petite diced tomatoes (I believe this one I used was a 32 oz.) The amount will equal about 2 regular sized cans. I used great value Wal-mart brand.
  • 1/2 chopped onion
  • chopped garlic clove
  • 1 -2 Tablespoons of fresh chopped cilantra
  • 1/4 to 1/2 cup (depending on your taste) of white vinegar
  • Sprinkle of Salt
  • 1 tsp. sugar
  • 1/4 tsp. black pepper
  • 1 tsp. taco bell mild sauce
  • Tortilla Chips for dipping
Note: If you like your salsa smooth (which I do) you'll need a hand held blender to blend the tomatoes. I have never tried this recipe without blending them, so I recommend doing so. I use a Durabrand hand held emmersion blender ($10.00 at Wal-mart) to blend salsa to desired consistency, I like it smooth.....not chunky. The hand held blender makes this a snap.....you blend it right in the saucepan.

In a medium sauce pan, bring the vinegar, onion, and garlic to a boil. Remove from heat and add canned tomatoes, rotel, and other ingredients. Now, blend with the hand held Emmersion Blender.... right in the pot. Once blended to desired consistency, return to heat and bring to a boil and then simmer for about 10 minutes on low heat. Let cool and serve with Tortilla Chips. Great for an appetizer or serve with a Mexican style dinner......like my taco recipe in the post below.

** Leftover salsa can be stored in an airtight container in the fridge for about 2 weeks.

Enjoy~

Restaurant Style Tacos


You will need:

  • 1 lb ground chuck
  • 1/2 chopped onion
  • small peeled potatoe quartered
  • chopped garlic clove
  • 2 Tablespoons chopped fresh cilantra
  • 2 tsp. white vinegar
  • 1 pkg. McCormick Taco Seasoning mix (see what package looks like below)
  • enough water to cover the meat in a saucepan
  • Salt and Pepper to taste

Put the ingredients in a medium saucepan and cover with water, bring to a boil.....then reduce heat and cover....cook for about 30 minutes or longer for more flavor.....

Other ingredients you will need:

  • Taco shells
  • Monterrey jack cheese grated
  • Shredded lettuce
  • Diced tomatoes
  • Sour cream
  • Homemade Salsa


This is what the meat ingredients will look like as it cooks....
(McCormick's Taco Seasoning Mix)

When the meat is done, spoon it into a bowl and salt and pepper it to taste, then stuff the tacos shells that have been heated according to package instructions.


Top with your favorite toppings..... I like to use Monterrey Jack Cheese, Shredded Lettuce, Diced Tomatoes, Sour Cream....and sometimes I add some of my homemade salsa too. Serve with Refried Beans topped with cheese, serve tortilla chips and salsa as an appetizer or to eat with the taco meal.
These tacos are so delicious.....the meat is very moist....I had always browned my meat in a skillet before, but I decided to try boiling it instead, and what a delicious difference it makes.
Enjoy~

Easy Honey-Glazed New Potatoes

For this recipe you will need:

  • 2 1/2 pounds new potatoes, cut into quarters
  • 1/2 cup butter or margarine
  • 1/4 cup water
  • 2 Tablespoons honey
  • 1/2 teaspoon salt
  • 1/4 teaspoon ground black pepper

In a large saucepan or Dutch oven cover potatoes with water and add some salt. Bring water to a boil and cook until potatoes are tender; about 12-15 minutes; drain.
In a large skillet, melt butter over medium heat. Stir in water, honey, salt, and pepper. Stirring occasionally, cook potatoes single layer at the time for 10 to 12 minutes or until lightly brown. When the sauce becomes thick it will be done. Before serving.... salt it to taste, if desired.
This is a delicious side dish. 

Enjoy~

Poor Man Dinner~ Easy Recipe with Ground Beef~


This Recipe has been around for as long as I can remember, It's a winner in my book, ( I first stumbled upon it over 20 years ago)......I especially like it because it's tasty, easy, economical, and the clean up is a cinch. You cook it all in aluminum foil in a pan in the oven. Now for the recipe....You will need
  • Ground Beef or Ground Chuck (enough for your size family, I used 1 pound)
  • Chopped potatoes
  • Chopped carrots
  • Chopped onion
  • Salt, I like to use McCormick's Seasoned Salt, or Mrs. Dash Garlic and Herb.
  • Pepper
  • A Side dish of your favorite Green Veggie
You first line a shallow pan with foil (get enough foil so that it can be wrapped over the top and closed on the edges), then make patties from the ground beef, season with plenty of pepper, salt (you can use Mrs. Dash or seasoned salt too) Add chopped onion to the top.....(Tip: you can use this cooking method for pork chops, chicken pieces also, and you can add your favorite veggies in to the mix....like bell peppers, or green beans...what ever you like to make it your own).

add chopped carrots and potatoes and more onions to the top....season generously with salt and pepper....


Now, over lap the foil over the top and then seal the edges rolling them closed. Cook in the oven at 350 degrees for 1 hour, then open up the foil carefully (it will be very hot) fold it back and cook uncovered for about 10 to 15 minutes longer.


It will look like this when it is done.....

I like to serve with a green veggie for a side dish ....I chose broccoli and cauliflower with cheese. The clean up is so easy with this meal....just throw the aluminum foil in the trash and you are practically done. 
Enjoy~


Easy Chicken and Dumplings Soup~ Delicious Comfort Food


This recipe is easy and delicious.....great on a cold winter day.....
For this recipe you will need the following:

  • 4 chicken pieces ( Sprinkle chicken generously with salt and pepper. Cover the pieces with water in a large pot (I used a dutch oven pot). Then bring them to a boil, reduce heat, cover and cook on med to med-high heat for about 45 minutes to 1 hour or until juices run clear when a fork is inserted. Remove from broth, Cool~ Debone~ and Chop) Note: Save chicken broth you will need it
  • Saved chicken broth from the water that you boiled your chicken in.
  • 1 can of Cream of Mushroom Soup (Campbell's)
  • 1 can of Cream of Chicken Soup (Campbell's)
  • 1 can of 10 count big country jumbo biscuits (I used Great Value brand buttermilk )
  • 4 boiled eggs (bring them to a boil and slow boil for about 13 minutes, then peel and chop)


After the chicken has been removed from the water that you boiled it in...do not pour out the water (broth)... save the broth and add more water if needed to have about what I have here in this large pot (dutch oven) Add the soups to the broth and stir well...bring it to a slow boil on med-high heat.....


While you are waiting for the broth and soups to come to a boil... get the biscuits ready. Take them out of the package one at a time and flatten them with a rolling pin. I use the back of a corelle flat plate to roll them out on....because it doesn't stick to it and I don't have to clean up a countertop.....it makes it easy.


Cut each biscuit in small pieces like this.....you can do this as you go, you will have time because you add the pieces one at a time.....


Once the broth mix has begun slowly boiling.....you drop the biscuits in piece by piece.....just drop them in one at a time and then stir ocassionally. After all of the biscuit pieces have been added....cook a few minutes on a slow boil.....between med to med-high heat....stirring occasionally to keep them from sticking......


Then add the chopped boiled eggs and chicken and stir...


Now, that everything has been added to the pot.....Cook on med. to low heat for about 30 to 45 minutes....or longer.....it just gets better the longer you cook it. TIP: You just want the soup to slowly boil....be sure to stir it occasionally to prevent sticking.....


It will look like this as it cooks......

This is what it looks like when it's done. 
You'll probably need to salt and pepper to taste now, ....it's delicious wonderful comfort food.....this is a recipe was passed down by my husband's mother.  She shared it with me many years ago.

Enjoy~

Easy Homemade Guacamole Dip


This is such an easy dip, and delicious served with tortilla chips. This is a wonderful appetizer when you are serving tacos or burritos.....
All you will need is 2 avocados (make sure that they are somewhat soft to the touch, when you are choosing these), a garlic glove, (chopped fine), a sprinkle of garlic power, and salt and pepper to taste.....


halve the avocados, and remove the seed.....


Scoop the flesh out of the shell into a small bowl and mash it well, with the back of a fork .....mix in other ingredients and salt and pepper to taste....


Serve with tortilla chips.... serve right away or chill in the fridge if you'd like it cold. This is best eaten fresh the same day that it is prepared....because.....I will tell you... that if this isn't eaten the same day as it is prepared.... the next day it will have turned a not so appetizing darker green on top. I have tried using lemon juice mixed in with the dip and this doesn't help....it always turns dark green the next day. This is best served fresh, the same day that it is prepared.....fix it just before serving.
2 Avocados yields enough dip for about 4 people as an appetizer. By the way you can add a dash of lemon or lime juice for added flavor if you'd like to. I sometimes do, if I have it on hand. This time I did not. Sometimes a cook has to improvise right? I didn't add any and we didn't taste the difference. Hope you will like this dip..... we really enjoy it.

Homemade Chicken Pie Recipe~ Great Comfort Food On A Cold Day


For this recipe you will need:
  • 4 chicken thighs boiled and deboned,(reserve some of the chicken broth for later)
  • 3 boiled eggs
  • 1 can Veg-all vegetables drained, (I used great value brand vegetable medley)
  • 1 can of cream of chicken soup, (I used Campbell's because it does make a difference)
  • 1 can of cream of celery soup, (I used Campbell's)
  • 1/2 of a can of the reserved chicken broth
  • 1 cup milk
  • 1 cup mayonaise
  • 1 cup self-rising flour (don't forget the self-rising flour, I didn't show it in the photo, oops)
Grease an oblong casserole dish with grease or Organic Pam spray, Lay the cooked deboned chicken in the bottom of the dish, add the chopped boiled eggs, then the can of drained veg-all, evenly over the top. Now, in a small bowl, mix the cream of chicken, and cream of celery soup with a half of a can of chicken broth. Pour this mixture on top of the chicken mixture and mix around lightly.
Next, in a small bowl mix up 1 cup of milk, 1 cup of mayonaise, and 1 cup self-rising flour, until mixed well. Now, pour this evenly over the top, and Do Not Stir, Lightly smooth it over the top....this is your chicken pie crust. Bake at 325 degrees for 1 hour.....
and it will look like this.... when it's done....nice and golden......


This can be a complete meal in a casserole dish, or serve it with your favorite green vegetable......This is easy and so delicious.....great comfort food on a cold day.......
Enjoy~